Friday, August 16

Styling a Bar Cart

Since we purchased our first home 6 months ago, I've been far more interested in styling my house rather than my attire.  (And I'm sure that when we have a baby one day, I'll be styling him/her rather than my house-- notice a pattern here?)  So, I thought that I may as well share some photos of my recently styled bar cart... even though there are a million of them already floating around Pinterest.


I woke up this morning with a major urge re-style this cart immediately.  I know, it's weird.  And since I'm on a major budget right now (teacher's don't get paid when they aren't working!), I took a quick trip to the grocery store to stock up on some items.  Everything else, I already had.


I bought this cart several years ago at a great store called Three Potato Four.  One day, I plan on asking my dad to help me repaint it.  He does auto body, so he can simply spray a new color for me.  In the mean time, I'm kind of a fan of this bold green.


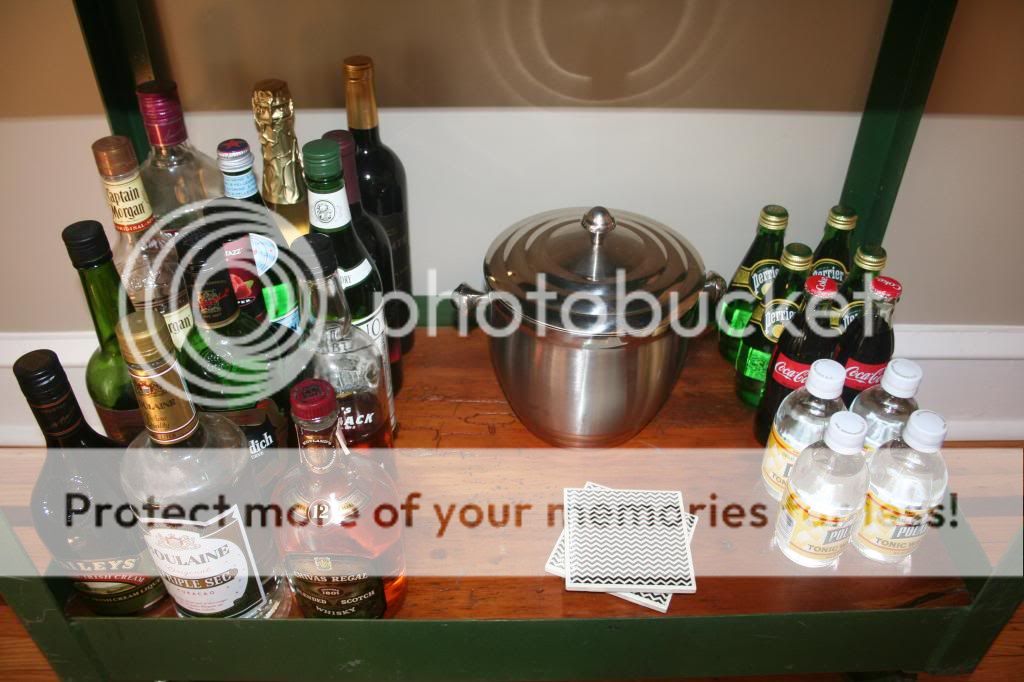
This glass bowl and blue tray are from Ikea, and the vintage bottle that I'm using as a vase was actually found in the ground!  These glasses are from a local antique store.  They were a present for my husband because he's such a big fan of trains (no, I'm not married to a 7 year old).


This vintage shaker and the glass decanter are pieces from Erik's grandparent's house.  The table and chairs are part of a dinette set that came from my grandparents.  My favorite part about decorating our home is having great memories from family heirlooms.  Even the smallest items can carry so many special memories.


For now, this area of our kitchen is almost complete.  I'm planning to move this chandelier eventually, to somewhere small, like a hallway or the laundry room, and add a larger light fixture to this space.  I also have to refinish the table and chairs and add a large area rug.  I was planning to refinish the furniture this summer, but I'm trying to decide whether or not to paint the chairs (or table) a bright color.  I really want to add color in this room from the chairs, but I'm afraid that I might regret altering the natural wood.  I've been considering going with a green similar to the bar cart... any suggestions?

Clock, Blue Vase, Flower Pot, Frame, Blue Tray, Glass Bowl, Curtains, Chandelier: Ikea
Salt and Pepper Birds: Chirp Collection from Lenox
Glassware, Table Runner, Silver Tray: Vintage
Vintage Map of NJ: Urban Sherpa via Etsy
Chevron Coasters: Ark Restoration via Etsy
Wood Blinds: Home Depot
Mirror: Home Goods

Monday, August 12

Summer Gnocchi Caprese

I've been making this dish every summer for the past few years but I usually don't bother with it during the winter months because using fresh tomatoes and basil is essential.  This caprese salad-meets-gnocchi idea started with the abundance of tomatoes I was getting every August.  It's one of those dishes that's very simple but high quality ingredients are essential.  Use fresh gnocchi (or make your own), and splurge on some good mozzarella.  If you aren't growing your own tomatoes this summer, hopefully your grocery store is stocking up on all of the local farmer's beautiful produce.


I prefer to cook minimally during the hottest parts of summer, and so the only reason to use your stove is to boil the fresh gnocchi for 2 minutes.  Everything else is prepped and kept raw, with the exception of the grilled chicken.

  • 2 lbs. gnocchi
  • 1 clove garlic
  • 1/4 cup olive oil
  • 1 packed cup of fresh basil
  • chopped parsley to taste
  • 3 medium tomatoes, chopped (you may want to core them slightly to remove excess water)
  • 2 Tbsp. grated Pecorino Romano or Parmigiana 
  • 1 lb. fresh mozarella, diced into 1" cubes
  • salt and pepper to taste

In your food processor, blend the garlic, olive oil, Pecorino Romano, fresh basil and parsley thoroughly.  You want to make sure that the garlic is minced as finely as possible because it won't be cooked.


Next, add the chopped tomatoes and pulse the food processor just a few times to chop the tomatoes to your liking.  Personally, I prefer to not over-blend the fresh tomatoes.


Boil and drain the gnocchi, then mix it thoroughly into the fresh tomato sauce.  Afterwards carefully fold in the diced mozzarella pieces.  Top with some additional Pecorino Romano.

If you're eyeing up the "chicken" on the side of my plate, I used Quorn's chik'n cutlets.  They were marinated for about an hour in olive oil, parsley, basil, salt, pepper, a chopped clove of garlic and a tablespoon of chopped onion.  I grilled them for a few minutes on each side, and they were ready to serve.  This recipe would also work with real chicken breasts, but why not do a meat-free protein?  (It's seriously delicious!)


PS. This was not a sponsored post.

Friday, August 9

OBX 2013


It's family vacation time at the Outer Banks!  This past week, we started off by celebrating my husband's 29th birthday.  We have enjoyed some great sunsets, played with the dogs in the bay, and relaxed indoors during some storms.  

Good laughs, great food and suntans have made it a seriously wonderful week.


Read about my 2011 OBX vacation here.

Thursday, August 8

Bright Whites


I'm spending the week on the North Carolina shore in the Outer Banks, relaxing with family.  Packing for this trip was surprisingly easy (mostly bathing suits and lounge-wear), however, I did stick a few great basics in my suitcase.  These white jeans from Loft and a white button-down from Gap are great for multiple outfits, but I love wearing a bold necklace with a monochromatic look.. so I stuck them together.

This bag is one of my favorite gifts of all time.  This past spring, my hubby came home on a regular Tuesday evening with a bag from J.Crew.  He wanted to surprise me with something, and picked this bag out on his own.  What a sweet gesture!  And even though I probably wouldn't have picked it out for myself, it's now become my favorite summer accessory... perfect with every outfit!


Necklace: Banana Republic
Sandals: J.Crew Factory
Sunglasses: Ray-Ban
Earrings: InPink
Bag: J.Crew
Jeans: Loft
Shirt: Gap

Monday, July 29

Arugula & Pear Salad with Lemon Parmigiana Dressing

I recently realized that when my hubby eats my typical boring salads covered in an array of veggies, he says that he doesn't have the same love for vegetables that I do.  He picks over the 20 different veggies that I throw into them, and moves right onto our main course.  However, when we're out at our favorite restaurants, he always enjoys their salad specials.  So I started thinking about some of my favorite salads, and realized that I have to be much more thoughtful with flavor combinations in order to produce something really exciting.


Inspired by many well-loved restaurant salads, here is my new favorite mix:

Salad Ingredients:

  • 4 packed cups of arugula
  • 1 bosc pear, thinly sliced
  • 1 small block of parmigiana (for shaving onto the salad and grating into the dressing)
  • 1/4 cup pine nuts
 

Dressing Ingredients:
  • Juice of 1 lemon
  • 1 clove of garlic, grated or finely minced
  • 1/4 cup olive oil
  • 2 tsp. grated parmigiana
  • 1 tsp. chopped parsley and lemon thyme
  • garlic salt and pepper
In a small bowl, whisk all of the dressing ingredients.  Pour the mixture over the arugula, pear and pine nuts, and toss carefully.  Top with shaved parmigiana (a vegetable peeler works perfectly for this).

While there is certainly no science to creating your favorite salad, I think that adding a sweet element to the strong arugula is a great pairing.  Also, you can never go wrong by investing in some good quality cheese.

Enjoy!

Wednesday, July 24

Summertime Professional


I recently had to attend an event that required professional attire.  As a teacher with a great summer vacation, looking professional during the summer is rarely ever a requirement for me, and pulling out a stuffy suit is the last thing I want to do.  So starting with my favorite blazer, I decided to add some bold summer color with this beautiful silk skirt.  To tone it down a bit, I kept my top and jewelry very neutral.  

Hope you enjoy my dog's photo-bomb.  You might think that she's smiling at you, but she's really just eating a stick... yes, a stick.  Obviously she isn't the one who had to be a professional today.


Blazer: Gap
Skirt: J.Crew
Silk Top: J.Jill
Shoes: Levity via DSW
Necklace: The Limited

Thursday, July 18

Our Wedding: The Reception

As someone who planned most of her wedding from online inspiration, I wanted to share a lot of fun details about our own special day.  When we were engaged, I was thrilled to find wedding posts, so if I'm lucky, hopefully I can give some soon-to-be-wed couples some ideas.  

Erik and I loved a lot of details about our wedding day.  We loved the rustic barn, the open view of the winery, and the beautiful scenery.  But most of all, we loved that we were having all of our events in one space.  Not only was the ceremony, cocktail and reception all held at the same location, but this was also where Erik and I stayed for the entire weekend, along with many of our friends and family. 

If you didn't catch the first half of this post, click here to read through our ceremony details.


Immediately following the ceremony, guests walked up the stairs and enjoyed an outdoor cocktail hour.


The card box was a great excuse for me to invest in a piece of vintage luggage.  I DIYed it into a card box by adding vintage doilies and creating a "cards" sign from glitter paper. 

Inside the reception space, name tags were hung in front of the windows and favorite family photos were displayed for all of the guests to enjoy.  This was a great project, and definitely worth taking the time to do.  Now that our wedding is long over, I have enjoyed decorating our home with these beautiful family memories!

I spent a lot of time agonizing over exactly how the reception room should look, and I couldn't have been happier with the outcome.  To save money on the flowers, I purchased silver mixing bowls from Ikea, which held the centerpieces.  The candle votives were found at Ikea and Pier 1 Imports, and were a mix of clear glass and mercury glass.  I got a little creative with some of the simple votives and glued on a little lace trim.  For our rentals, we kept a subtle vintage feel with simple beige and white linens and upgraded to bentwood chairs, which gave the entire room a classic touch.


Our favors were so beautiful, and a huge commitment that was taken on by my mother and sister.  They spent countless hours making homemade strawberry jam.  I picked out a pretty white fabric to go over their jars, and we tied custom labels to each one.  My only gripe with these is that I never got a chance to take one home!
Although I loved the top lace piece that I added to my dress for the ceremony, I also loved that it was easily removable.  For the reception, I removed the top, added a belt and some more dramatic earrings from Tejani.  A great piece of advice that I received about expensive bridal attire is to create your own belt!  Bridal belts will sell for hundreds of dollars, which is outrageous.  I found two small appliques for around $5 a piece, then took them to my bridal salon and paid the seamstress to sew them to a matching ribbon.  This way, the ribbon still matched my dress perfectly, but it saved me a lot of money.


Another great DIY idea (from Pinterest!) included our chair signs.  Although we sat with our backs against the wall and not many people saw them, they were incredibly easy to make.  My dad found the old wood and cut the pieces for me.  I simply painted them, glued on some moss I found at the craft store, and added string to hang them.


This was our amazing band, Jump City Jazz Orchestra.  For Erik and I, music was the most important part of the night.  Hiring this band was the best decision we could have made.  From the moment we began working with them, we knew we were in good hands.  They played all of the classic songs we were hoping for, and transitioned beautiful into the best party music.  Our first dance was to the song, "Summerwind" by Sinatra.


The next set of photos just don't do our dessert table justice.  This is simply the most incredible gift we could have been given.  My aunt, who has always been a great amateur baker, offered to make everything on this dessert table.  My sister and mother were able to offer their help, but she took this project and really ran with it.  Some of our desserts included red velvet and chocolate cakes, cheesecake, raspberry torte, coconut cake, carrot cake, biscotti, and endless amounts of cupcakes and cookies.  After the wedding, I found out that she took every one of these recipes for multiple trial runs before baking the real deal.  Every time I look at these photos, I am blown away by her talent and her generosity.  


The vintage cake toppers are two sets of salt and pepper shakers that I found on Etsy.


Looking back on these photos reminds me of every incredible moment of our special day.  While it all happened so fast and I often wish I could relive it, I'm always blown away by the happiness, love and commitment that I see in our pictures.  Not only did planning this wedding bring Erik and I closer together, it brought our families closer.  And to Erik and I, that was the biggest reason that planning a traditional wedding was important to us.  So thank you, loved ones, for your once-in-a-lifetime memories.

Photography: Michael Mancuso (most, but not all of these photographs were from Michael)
Jazz Quartet and Band: Jump City Jazz Orchestra
Catering: Brandywine Prime

If you actually made it to the end of this incredibly long and picture-heavy post, congrats... and I'm sorry!  I am taking on the responsibility of building our own wedding album, which I haven't yet started, so I am planning to use these posts to help me get that job done!